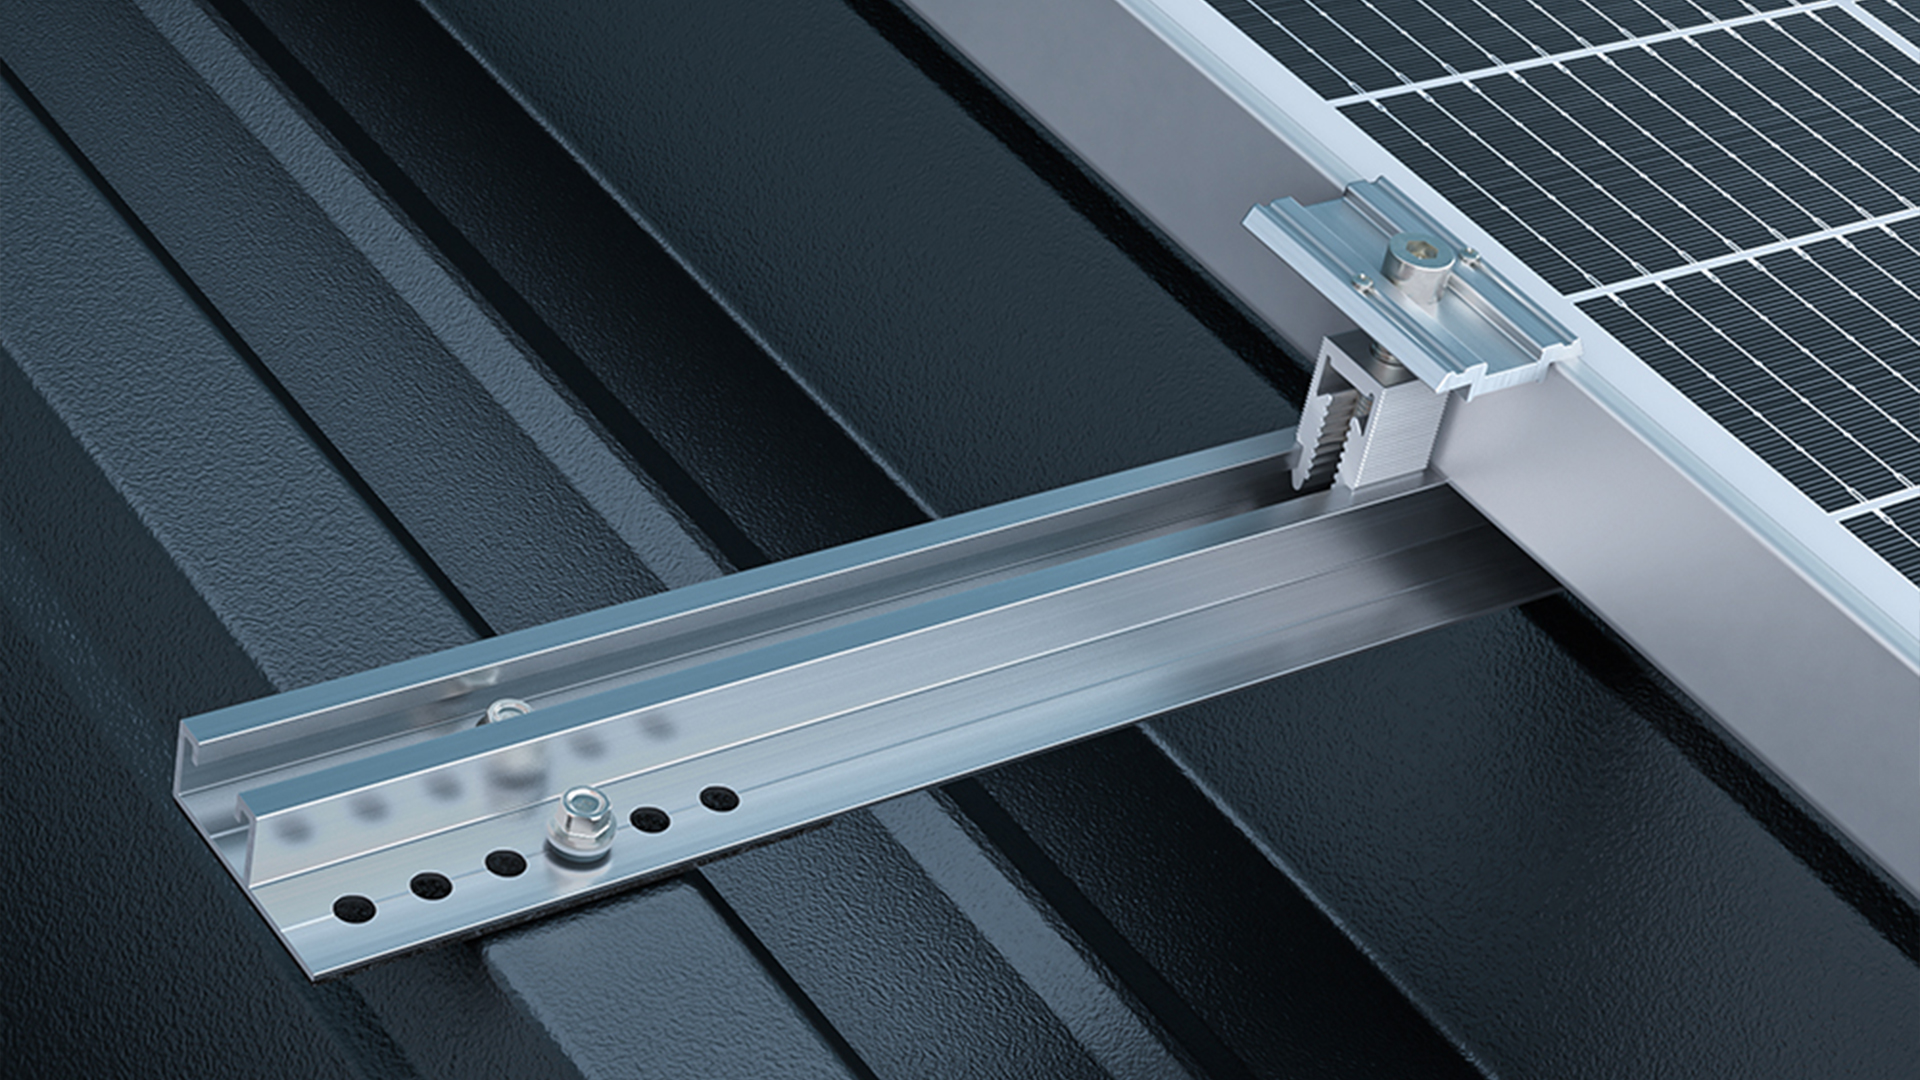
On trapezoidal sheet metal, the PV substructure is screwed into the sheet; on standing seam roofs, it is clamped in place; on sandwich panels, it is supported by a self-supporting rail; and on corrugated sheet metal or corrugated fiber cement, the rail is mounted on hanger bolts. This guide matches each profile to the appropriate system, explains why it is fastened that way, and shows you what information you need for the design. For tiles and other roofing materials, the pitched-roof guide shows you which fastening method is suitable.
Every fastening system serves the same purpose: it transfers the system’s wind and snow loads to the supporting structure without overloading the roof sheathing, while ensuring the roof remains watertight. Which part of the sheet metal can bear the load depends on the material. On trapezoidal sheet metal, the high ribs accommodate the screws. The thin outer shell of a sandwich panel is not designed for this; there, the load is transferred to the purlins below. The question, therefore, is not whether PV is suitable for a sheet metal roof, but rather what type of mounting the specific sheet metal requires.
Do you already have the specifications for your roof? Then set up the project directly in AEROTOOL. The system will generate the design and bill of materials.
Which mounting system is suitable for which metal roof?
The table matches each profile to its corresponding system; for trapezoidal sheet metal, there are three options to choose from. It provides an initial guide; only the design calculation will show whether the system is suitable for your sheet metal.
Trapezoidal Sheet Metal: Trapezoidal Bridge, Short Rail, or Hanger Bolt?
There are three options for trapezoidal sheet metal. All three involve screws passing through the roof sheathing. They differ in where the load is transferred to the roof and which module format they support: With TL, two high ribs bear the load; with TS, one does; and with XW, the hanger bolt transfers the load to the substructure. Two questions are particularly important when making this choice: What is the spacing between the ribs, and what format should the modules be in?
COMPACTMETAL TL: Bridge spanning two raised ribs
The TL bridge spans two raised ribs and distributes the load across both. It is screwed into place without chips and without pre-drilling, so no drill chips remain on the sheet metal. The click-in module clamps sit directly on the bridge, eliminating the need for a base rail. The rib spacing determines which bridge is suitable: TL25 covers 100 to 210 mm, and TL38 covers 211 to 333 mm.
TL is designed for trapezoidal steel and aluminum sheets and for high wind and snow loads; the modules are installed parallel to the roof in portrait orientation. A module array can extend horizontally up to approximately 12 m in length. The system does not specify a fixed minimum distance from the roof edge; the extent to which the array extends to the edge is determined by the project calculation. TL is also suitable for arched and curved metal roofs. In Fidenza, Italy, TL generates 3.4 MW on a curved roof. In Piedmont, there is an 80 kWp TL system.
Variants, Specifications, and Downloads:
COMPACTMETAL TL
COMPACTMETAL TS: Short rail on the high rib
TS is mounted as a short rail on a single high rib, 80 mm long as TS08 or 150 mm as TS15. Because each short rail requires only one rib, TS is less dependent on rib spacing than the bridge system. TS is also installed using a chip-free method without pre-drilling. TS15 is secured with three screws instead of two, which distribute the load across more mounting points. Therefore, TS15 is intended for thin sheet metal.
With TS, the modules are arranged in landscape orientation. The module array is not limited horizontally; vertically, it extends to about 5.7 m or five modules. TS is designed to be installed by a single person. The fact that it can also cover large roof areas is demonstrated by the 2.5 MW installation for EDEKA in Gochsheim and the 1.1 MW installation in Ócsa, Hungary.
Variants, Specifications, and Downloads:
COMPACTMETAL TS
COMPACTPITCH XW: Rail mounted on hanger bolts
With the XW system, a hanger bolt passes through the roof sheathing into the substructure, and the base rail is mounted on it. Unlike the TL and TS systems, the XW does not restrict you to a specific module format: In landscape orientation, the modules are clamped directly onto the base rails; in portrait orientation, they are secured via a cross-braced connection with a second layer of rails. You adjust the height using the long threaded shank, allowing you to align the rail even if the roof surface isn’t completely level. XW is not limited to trapezoidal sheet metal but is also designed for corrugated sheet metal, sandwich panels, and corrugated fiber cement. The choice between the two variants depends on the snow load: XW is the cost-optimized solution for areas with little snow, while XWS is designed for regions with heavy snowfall.
Variants, Specifications, and Downloads:
COMPACTPITCH XW AND XWS
Sealing and Cable Routing for TL and TS
A sealing tape is pre-installed beneath the bridge and short rail of the TL and TS systems, which seals against the sheet metal; a sealing washer additionally seals at each screw. This second sealing layer depends on the screw connection: For the TL, the assembly instructions specify that the washer should be compressed by about 30 percent. Therefore, tighten the TL screws without an impact wrench and use each one only once. An impact wrench can damage the threads and the sealing washer and tear out the thin sheet metal. This ensures that the screw connection remains airtight when installed properly. Route the cables through the OC module clamp, which has a channel for two cables, or—for TL—using cable clips that keep them away from the sheet metal.
Standing-seam roof: PV installation without penetration
On a standing seam roof, the roof membrane remains intact: COMPACTMETAL TM clamps onto the seam; no screw penetrates the sheet metal. The clamp holds the module in place via a form-fit connection—that is, by the shape of the seam—and is designed to withstand high snow and wind loads. A short rail is pre-mounted on each clamp. In landscape orientation, you place the modules directly onto the clamps; this allows a module array to span up to three modules vertically, and up to six on aluminum roofs. For portrait orientation, a cross-rail assembly is created using X40 or X50 rails with the XPN cross connector.
The seam shape determines which clamp is suitable. Therefore, during the site visit, take a photograph of the seam profile in cross-section. The correspondence:
- Double standing seam: TMDS08
- Angled and snap seams, such as the Nordic Klick seam: TMM08
- Round seam such as BEMO, Kalzip, Aluform, or RIB-ROOF Evolution: TMR08
- RIB-ROOF 465 and GBS: TMRD08
- Domitec, KLIP-LOK 406, and SAFLOK 410: TMK1508
- KLIP-LOK 980/700 and WeatherClip: TMK2008
TM has been tested on folded sheets ranging from 0.5 to 0.8 mm thick, including titanium-zinc and stainless steel. On copper roofs, the DSA10 stainless steel saddle is also used. It separates aluminum and copper to prevent electrochemical corrosion between the two metals. If a lightning protection system is in place, integrate the system using the WCL8-10 wire clamp. In the U.S., TM is used on, among other projects, the Washington Tennis & Education Foundation’s 743-kWp system.
Clamps, Specifications, and Intake Form:
COMPACTMETAL TM
Sandwich Roof: Why Wind and Snow Loads Must Be Discharged Separately
The outer shell of a sandwich panel is thin. If you screw the substructure directly into this shell, you risk leaks, and the outer shell can detach from the panel.COMPACTMETAL TR removes precisely this point from the load path.
The patented, self-supporting long-rail system runs parallel to the roof and separates the loads: Wind loads are transferred via the sandwich fasteners and the rail, while snow loads are transferred to the substructure via a separate support system. The self-tapping screw is secured in the steel or wooden purlin, and the TR15 base seals the joint with a rubber gasket. The panel thus remains what it is intended to be: a roof covering. The load is borne by the purlin beneath it.
The intermediate supports are calculated so that the rail does not come into contact with the roof. To achieve this, AEROTOOL calculates the lower and upper panel stiffness and uses these values to determine the number of screws and additional module supports. A proprietary structural analysis algorithm prevents the panel from being overloaded. The TR74 rail is designed for high wind and snow loads, while the TR59 is designed for reduced snow loads.
TR is designed for sandwich panels that are walkable according to EN 14509, with panel thicknesses ranging from 60 to 162 mm and a steel outer shell starting at 0.4 mm. In Germany, TR has a general building authority approval and type approval from the German Institute for Building Technology (Z-14.4-996), valid through July 3, 2030. It also specifies the installation procedure: The screws are driven without an impact driver, and the contractor confirms the installation with a declaration of conformity. The approval does not replace a building permit, and each project requires its own structural analysis.
Sandwich panel manufacturers recommend the system. However, the documentation required for your project depends on the specific panel actually installed and the manufacturer’s specifications; you should clarify this before installation. The references show just how widely it is used: from 24.65 kWp for 1KOMMA5° in Rostock to 90 kWp in Schlierbach and up to 2 MW in Frankenförde.
Rails, technical specifications, and certification:
COMACTMETAL TR
Rear ventilation and mounting on a metal roof
After selecting the profile, the second decision is the installation height. Without a riser, the TL and TS models leave only 18 mm between the module frame and the sheet metal. A greater clearance offers two advantages: more air flows beneath the modules, cooling them, and there is space for power optimizers. If you’re planning to install power optimizers beneath the modules or if the site is exposed to sun and heat year-round, opt for the 80-mm-high TLE and TSE15 variants or the EL05 and EL10 risers, which increase the clearance to 50 or 100 mm. The EL05 is also available for TM. For the TSE15, all you need is a bit extension, which the AEROTOOL recommends right away.
On very flat metal roofs or those sloped toward the east or west, it may make sense to raise the modules. For TL and TS, this can be done with tilt adaptors: They’re available as PS, PM, and PL in three heights and with a 5° or 10° tilt; for TS, they’re also available for east-west orientation. Row spacing, shading, and wind loads change, so the structural analysis must be recalculated. For TL, the EL10 riser cannot be combined with PS, PM, or PL.
Three steps to finding the right system for your metal roof
- Determine the profile. Trapezoidal sheet metal, standing seam, sandwich panel, or corrugated sheet metal: The profile determines whether the system is screwed, clamped, or secured using a self-supporting rail. The table above shows which systems are suitable.
- Gather information for the suitability check. We check the suitability of a trapezoidal sheet based on the profile designation, rib spacing, and sheet thickness. The COMPACTMETAL TS/TL intake form gathers all project details; for standing seam roofs, a separate intake form is available on the TM page.
- Design the project in AEROTOOL. There, the mounting system for your roof is calculated, and the bill of materials is generated. You should clarify the load-bearing capacity of the roof structure and the module manufacturer’s approval in advance with the project stakeholders.
Record the following information during the site visit:
- For trapezoidal sheet metal: sheet material (steel or aluminum), sheet thickness, rib spacing, and profile designation
- For standing seam: a photo of the seam profile in cross-section and the roof dimensions with seam spacing
- For sandwich panels: manufacturer and type of panel, panel thickness, material and thickness of the outer shell, and the material of the purlins (steel or wood)
- For every roof: roof shape, ridge height, roof pitch, presence of obstructions, module data, orientation, and desired mounting system
For installation on sheet metal:
- TL is installed by a professional contractor according to the assembly instructions; installation must not be performed in wet conditions, strong winds, or freezing temperatures.
- The screws are driven in without an impact driver; for TL, this is specified in the assembly instructions, and for TR, in the certification.
- On thin sheet metal, distribute the load when walking on it.
- Tightening torques, speeds, and edge distances are specified in the assembly instructions for the respective system.
Design your project now in AEROTOOL → Based on the data from the site survey, the system will generate a design and bill of materials specifically for your metal roof.
Still unsure about which system to choose? An overview of all systems for pitched roofs
Frequently Asked Questions About PV Sub-Structures on Metal Roofs
Why is it often said that PV doesn’t work on sheet metal roofs?
Because damage occurs when the fasteners and the roof profile aren’t compatible. One example is the sandwich panel: Screws driven into the thin outer shell can cause leaks and may loosen the outer shell. Trapezoidal sheet metal, standing seam, sandwich panels, and corrugated sheet metal are still suitable, however, provided the fastening method matches the profile, the design confirms the mounting system is suitable for your sheet metal, and the roof structure can support the additional load.
Do you have to drill through trapezoidal sheet metal for a PV system?
You don’t need to pre-drill; the screws will go through the roof sheathing anyway. TL and TS are screwed in without pre-drilling, while with XW, the hanger bolt goes through the roof sheathing into the substructure. The only method that requires absolutely no penetration is the COMPACTMETAL TM clamping system, which requires a standing seam roof.
Will the metal roof leak as a result of the installation?
No, not if the system and installation are compatible with the roof. For TL and TS, a pre-installed sealing tape and a sealing washer on each screw provide a seal; for TR, a rubber gasket at the base provides a seal, and no screws are driven into the top panel. A risk arises if the assembly instructions are not followed. One example is the impact wrench: TL and TR models are screwed together without it; for TL models, this ensures that the threads, sealing washer, and sheet metal remain protected.
What thickness must trapezoidal sheet metal have for PV systems?
There is no minimum thickness for all metal roofs; each system has its own lower limit. TL and TS are designed for aluminum sheet starting at 0.5 mm or steel sheet starting at 0.4 mm; for thin sheets, TS15 is intended for use with three screws. TR requires a steel top sheet starting at 0.4 mm; TM has been tested on standing seam sheets ranging from 0.5 to 0.8 mm. The project calculation—which includes the profile, seam spacing, and sheet thickness—will determine whether your sheet metal can support the system.
Can PV systems be mounted on sandwich panels?
Yes, using COMPACTMETAL TR for sandwich panels that are walkable according to EN 14509 and 60 to 162 mm thick. The rail transfers the snow load to the substructure via its own supports without screwing into the top shell. In Germany, TR has approval Z-14.4-996. In AEROTOOL, TR is designed so that the panel is not overloaded. Whether the underlying roof structure can support the additional load is determined by the structural analysis required for every project.
Does the PV system on the metal roof need to be grounded?
Whether and to what extent this is necessary depends on the project’s lightning protection and equipotential bonding concept. The mounting system includes the necessary components for this: With the TLE bridge, a star-shaped punch hole provides a conductive connection between the clamp and the bridge; the click clamps and the OC module clamp have grounding pins. With the TM system, the WCL8-10 wire clamp integrates the system into an existing lightning protection system.
How is the substructure on the metal roof maintained?
For TL and XW, the assembly instructions specify the first inspection after 12 months, followed by inspections every 24 months, plus a visual inspection after extreme weather events. To qualify for the extended 25-year warranty, you must document maintenance for these two systems; this is mandatory in the 12th year. The corrosion protection for TL and XW complies with ISO 12944. If the building is located near the coast or near heavy industry, please consult our customer service department beforehand.